This series of six articles was originally published
by Pete in the late 90's and looks at programming natural sounding drum
parts with human feel. Thanks go to Alex Van Laningham for
offering to type these articles out from the pdf scanned versions found
elsewhere on the site.
IN THE
GROOVE PART 1
Getting natural-sounding drum tracks is easy using
sampled loops, but what it you want to (or have to) program them up
yourself? In this new series Pete gives some programming secrets to get
your drum tracks into the groove...
For those of you out there with samplers, the goal of
getting a reasonably natural-sounding drum track sequenced up is not a
great leap of the imagination. However I know there are a lot of people
who spend hours stooped over the computer, embedded in the drum edit
page or step write mode writing grooves which never sound like anything
other then sequenced drum parts. Why? And how can this be changed?
Hopefully, these articles will give you an insight into how you can make
your sequenced drum parts more natural sounding and dynamic. The series
will centre around the event list and will look in detail at alt the
parameters, such as velocity, note length and exact timing at beats,
down to the smallest ticks.
THE EVENT LIST
To begin with, for those at you that have not
concentrated on the relevance of the even list, let’s take a look at
what it's all about. To begin with it looks complicated, but don’t
despair — its actually quite straight forward. All it tells you is what
you played. When you played it, how hard you hit, and how long the note
lasted. It also tells you what MIDI channel it was recorded on, and what
'Status' the event was (whether it was an odd a volume control message
or any other MIDI event). For the sake of this series, these last two
will always be set to note, and MIDI channel 10 - the channel most often
used for drums.
Right then, here is the event list. To begin with, we'll
look at the first four settings.

!Bar tells us in which bar the note was played. 1/4 tells
us in which 1/4 note of the bar the note was played. 1/16 tells us which
16th note with in the quarter note, and finally 1/768 pinpoints the
event down to the particular 16th divided into 48 pulses - 768 per bar
(it is possible to increase this on some programs to 1536 per bar.
Different programs display the event list differently but the general
approach is the same.) This time division of the beat may seem
unnecessary but, it is actually one of the most important tools in
making grooves sound natural.
We then have Status and Channel (as mentioned earlier).
Following this we have what are called the first data byte and the
second data byte, so called just to make something simple appear
complicated. This is what it actually means: First data byte is the note
you played, for example C#1 (C3=middle c). This identifies the note on
the keyboard you will need to hit to locate a particular sound. For
example, C2 is often a bass drum sound. Of course, if you have set up
your drum map, then each event for our drum grooves will be defined as
Hi-Hat, Bass Drum and so on. Second data byte shows the velocity of the
note you played. The only other thing to mention in the event list is
the note length. This is self explanatory and not so vitally important
with sequenced drums because of the short length of the drum sounds.
Right then, let's get onto the drumming. To begin with,
we're going to look at a couple of basic drum patterns which have been
the corner stone of drumming over the last forty years, and the patterns
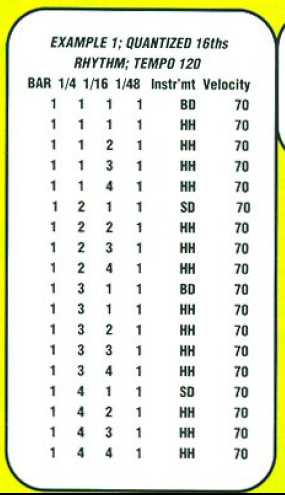
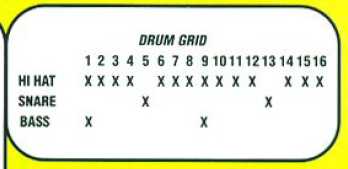
a drummer learns first. Example one is about as simple as you can get.
Quarter notes on the Hi Hat, beats one and three on the bass, and beats
two and four on the snare. Write it in on the drum edit page with the
quantize set at 1/4 and this will be the readout for the first bar for
placement and velocity.
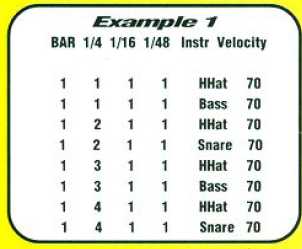
As you can see and hear, it's specifically on the beat
and rather dreadful. Notice how each beat is accurate, right down to
those semi-quavers divided in 48 bits. Even the velocities are
identical. Of course, you could humanize the rhythm with some of the
function in your program but, in my experience I've never found this
satisfactory in creating a natural feel.
Now let's look at the settings for the same rhythm as
played by, God forbid, a drummer on a MIDI drum kit. I've used the Power
Drum set on the Roland JV-1080 to write these rhythms. Played back on
some other kits in the same unit the general mix sounded different; for
example, played on the GM drum set, the Hi Hats got a little bit lost.
Bear this in mind, and choose a kit which represents all the sounds
clearly.
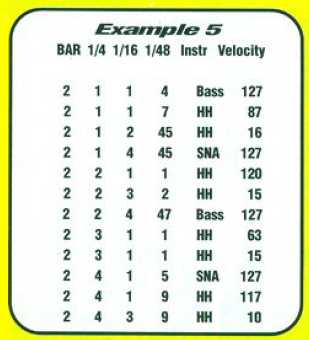
I find the readout of this rhythm quite extraordinary.
I've also kept in the first beat of the second bar. This happens to have
fallen in a very interesting place, as will be discussed in due course.
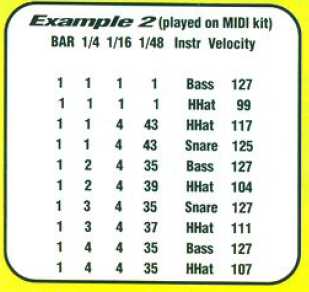
As you can see, although we started smack on beat one, by
the end of the first bar, we're thirteen pulses early. The first Bass
and Hi Hat or bar two have been included in bar one's list. I was
shocked when I first saw a readout of my playing in an event list. I
even tried to change it so as it was specifically accurate but, the
closer I got, the less natural it sounded. So then, as is evident, we're
anticipating the beat. If you look closely at the rhythm, other things
become evident. The Bass and Hi Hat, which should be together on the
beat three of the bar, have fallen apart by four ticks, as have the Hi
Hat and Snare on beat four, by two ticks.
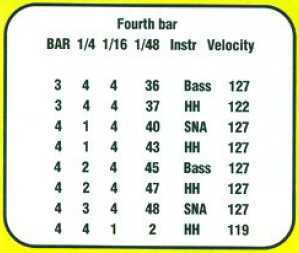
As I mentioned, by the end of the bar, we're thirteen
pulses early. This can cause some problems when cutting and pasting
individual bars, but we'll discuss this in a later article. You would
think that if this carried onto its logical conclusion, then by the end
of the song the drums might be a bar or so ahead of the rest of the
tune, like two badly synchronised timecodes. This is not the case at
all. If we look at the remaining three bars of the example, we see that
it settles within the general parameters of being between two and
fourteen pulses ahead of the beat.
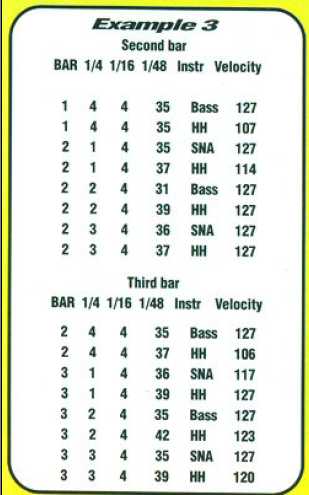
Here is the readout for the remaining three bars of the
rhythm. Don't forget, the first Bass and Hi Hat have been included in
the readout of the previous bar. As you can see from the lists below,
I've split them into their proper groups. This is how the first two
events of each list contain the previous bar number.
!
High velocity Next we're going to look at the velocity
readout for the first bar of our rhythm (See example 1). As Opposed to
all the velocities being identical. what we have is a range of different
velocities. This all becomes more striking in more complicated examples.
Bass drum and snare notes are consistent at a velocity of 127, though
they may well actually be above this. Its the Hi-Hats that prove to have
the most inconsistent velocity values in his example. Even so, they
remain quite high, never going below 99.
This first rhythm is only a simple one and doesn't
contain too many profundities. What I hope to have shown by looking at
it in this way, is how inaccurate The real thing actually is. If we take
away this inaccuracy, then we're taking away the main components of the
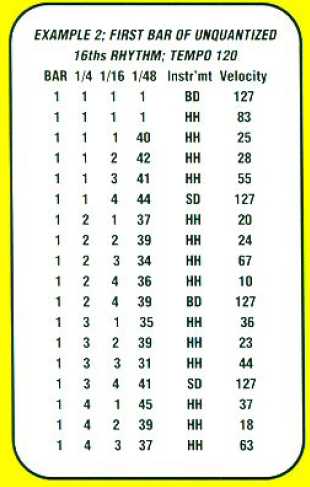
feel. This all becomes more interesting when we look at our second
rhythm, basic eight-note rock. Obviously all the notes in the quantized
version will tall on the beat exactly so, let's go onto the version as
played in by our ever reliable real person. Look at the event list tot
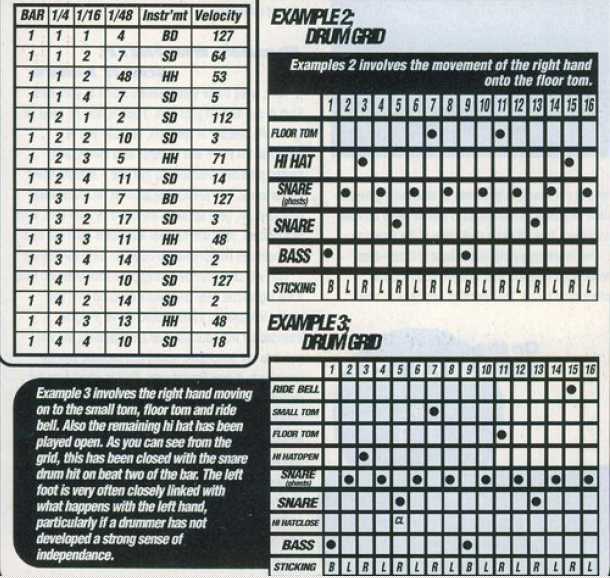
the first bar (Example 2)
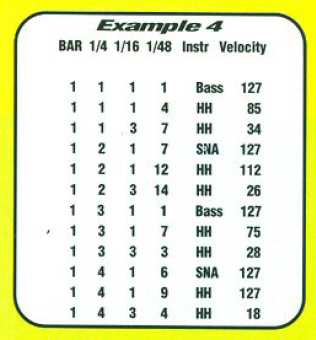
The first two things I notice about this is, unlike our
first rhythm, the notes are generally tailing behind the beat, and all
of the notes that should be together are actually a few ticks apart The
Hi-Hat is late on every beat, even on the first beat. Also of note are
the velocities of the Hi-Hat ranging from 18 to a maximum 127. It is
important to note That the Hi Hats falling on the beat are stronger than
those on the 'and' of each beat. The Bass and Snare are being Thumped
out at maximum volume and both seem consistent in their placement(of
course, if you wanted the velocities to be less than this you could
change them for the whole rhythm, then you could do this in the
Transform window or in an edit page. Remember, there are always lots at
different ways to do the same thing on all these programs. To keep the
balance of the rhythm the same, make sure you do an equal subtraction of
velocities for all the sounds).
Both Bass drums are accurate down to the finest tick.
This is amazing, because there was absolutely no quantize used at all.
The Snare, on the other hand, is falling 7 ticks late on beat two and 6
ticks late on beat four. Of course, one very important thing not to be
overlooked when looking at readouts like this is the tempo that they
were performed at. Quite un-imaginatively, these grooves were written at
120 bpm. This means 120 1/4 notes at 192 pulses per quarter note. This
is equivalent to 30 X 768 pulses (23,040) pulses per minute. Obviously,
if the tempo was different then there would be more or less pulses per
minute err, more or less. Let’s look at the second bar of the event
list.
Things change a little here. The Snare becomes
anticipated on beat two, whilst the Hi Hat ends up smack on the beat.
The same happens on beat three with the Bass and Hi Hat. Notice how the
Hi Hat and Bass Drum on beat one are three ticks apart, and also that
they are late. It is the combination of these factors which contribute
to what does and doesn't sound natural and grooving.
Velocities follow a similar pattern and shape. It is
important to balance all the sound in a logical way. For example, if the
Hi Hat is the same velocity as the bass and snare, then you'll end up
with a pretty un-dynamic sounding drum groove. The musical idiom you are
working in will dictate how you balance the drum sounds you program. If
you are working in a less ‘back beat' environment, then the velocity
levels of all the sounds might be closer to each other than if you
needed the bass and snare thumping out time.
One stylistic point which comes to light when we compare
our two rhythms is the role of the Hi Hat. It is clearly different in
both examples. In the 1/4 note example, its velocities are way up in the
comparison to the 1/8 note example. This is because the 1/4 note pulse
is being laid down so heavy in the first rhythm. Even thought the 1/4
note pulse is state in rhythm two, the velocities of the Hi Hats get
nowhere near as high.
Now we can move on to a lot more rhythmic examples and
basic philosophies of how and why drummers do what they do, and sound
like they sound. We are also going to look at some interesting
combinations of Drums and Percussion.
IN THE
GROOVE PART 2
Lets continue looking at programming drums and percussion
with an emphasis on getting as natural a feel as possible. To do this,
we are focusing on the event list and looking at rhythms through a
magnifying glass, stripping each beat down to its smallest sub division
of time, as well as looking at the dynamics, velocities and general
concepts behind the rhythm. Before we get on to building concepts and
methods of ‘naturalizing' grooves, let's look at another simple rhythm
and re-familiarize ourselves with how we analyzed it last month. The
rhythm in question is a basic sixteenths beat for hi-hat, bass and
snare. Here is the readout as would appear in the event list. If we look
at example one, we see the stiffly quantized version with all the notes
falling exactly on the beat and all the velocities identical at 70. This
sounds particularly unmusical and unnatural. This is the art a good
drummer strives to perfect, adding groove to the music and driving the
song. Let's look the identical groove as played in by our trusty,
un-quantized drummer.
!
The first thing that is clearly evident is how the bass
and snare velocities stand out from those on the hi hat. It is quite
often the bass and snare which dictate the shape of the groove. Rhythms
on drum kit can be looked at as melodies constructed from phrases played
between the bass and snare. If sounds which are not an integral part of
this melody come in too loudly and confuse the clarity, then you may
well end up with a less effective rhythm than desired.
The same goes for percussion parts (we will be covering
percussion more later). Sounds such as open tones and slaps will dictate
the rhythmic melody. Other sounds such as muted tones should be very
much in the background and not interfering with the general shape. There
will be essential sounds in the foreground whilst the supporting tone
fabric will be in the background.
The next thing of note about our rhythm is it's pushed
nature, dictated by notes falling ahead of the beat by anything up to 15
ticks (Excluding the first hi hat and bass, pushed on to the first beat
by the program).
!
It is this anticipation of the beat which gives edge to a
drum pattern and helps it drive the song. (As apposed to ‘playing
behind the beat’ as one might do with a ballad.
Of course, it's not as simple as moving a whole quantized
beat ahead by a few ticks. If you look at the placement of all the Hi
Hats in our un-quantized pattern, you will see that it appears quite
random and on the edge of being wrong. As with last month's examples,
some notes are coming so early as to technically appear in the previous
beat. For example, the first snare beat comes a few ticks early on ‘ 1 1
4 44' as opposed to ‘1 2 1 1” in our quantized version.
If you look at the velocities of the Hi Hats for each
quarter note of the first two bars, you will see that there are no two
groups of sixteenths the same. This is one of the elements which keeps
the rhythm flowing. The fundamentals remain yet the time is quite
elastic. This gives us freedom to explore and experiment with rhythm
ourselves via the event list, without worrying about having to work with
hard and inflexible rules. Let's try an experiment.
Take the quantized version of the rhythm, loop the first
two quarter notes and go into the event list. First of all, bring the
bass and snare beats up by increasing the velocity to between 100 and
127. Now lets look at the hi hats and begin to alter their velocities.
Work slowly, adjusting one note's velocity at a time and seeing how it
affects the sound of the rhythm. The transformation will be very
gradual.
The velocity range of the hi hats should aim to be
between a quarter and half the velocity of the bass and snare. Don't
forget, you don't want all the Hi Hats to be identical velocities. Try
to find the dynamic shapes which sound most effective. For example, you
might want the hi hats to get louder during each 1/4 note, building up
to each man beat on the bass and snare.
Now the time has come to explore different timing
placements (it might be advisable to make backup copies before you start
to work on rhythms or else you might lose what you had in the first
place. It is often quite a good idea to work in an editor from which you
can escape if you do not like the changes you've made). More subtle work
and patience is required here. Get a general concept before you start
pulling the beat about. Do you want it to be ahead of the beat or behind
it? If so, by how much? How intense and driving do you want the groove
to be?
The image I have in mind when manipulating the timing of
a rhythm is the stretching of a piece of cloth. All the parts move in
relation to one another. If a part of the cloth is pulled tighter then
the parts nearer to it will move more than the parts farther away. This
is the concept that will keep your rhythms intact and not sounding
disjointed. Big angular leaps in the timing will simply sound wrong.
Experiment to find things which sound right for you. Work
with smaller adjustments before going on to more adventurous
alterations. To begin with the first few steps may sound odd,
particularly when you've only altered a few of the notes, leaving some
still quantized. Don't let this bother you as it all pulls into shape
the more you proceed.
When you're satisfied with your first altered groove,
save it as ‘Rhythmic template 1'. Then work on another and another,
giving yourself a number of building blocks which you can juxtapose in
any order to crate the desired flowing feel. Some work may need to be
done on seamlessly joining these parts together but more about that
later.
One thing to note is that if you end up using these
un-quantized grooves in work that has quantized patterns then it may
well sound out of place. You will need to make a template from the
un-quantized rhythm and use that to quantize the whole song, or at least
the parts that don't sit so well. It may sound like a lot of work but it
really is worth it in the end.
To finish off I'm going to look at a couple of different
voicings for our basic pattern. These involve taking our un-quantized
groove and moving some of the notes onto other drums in the same way a
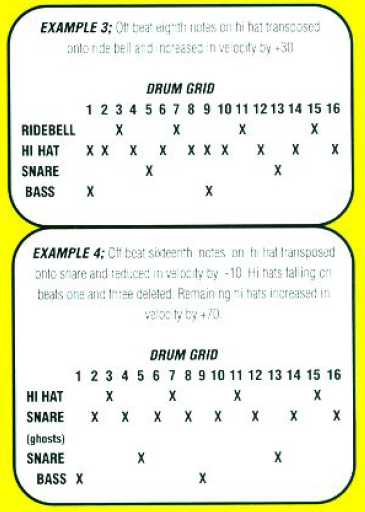
drummer might do. In example three, I've changed all the Hi Hats falling
on the third sixteenth note of each beat onto the bell of the ride
cymbal. A simple voice substitution like this is exactly what might be
done to differentiate between the verse and chorus of a song.
Example four is a further extension of this idea and
entails putting every off beat Hi Hat onto the snare drum. This is what
a drummer might do by moving his left hand from the Hi Hat onto the
snare. These notes would then be played as subtle ‘ghost' notes. Example
four also involves the exclusion of the Hi Hat played with the bass
drum. This creates a more off beat sound for the Hi Hat part.
Re-orchestrating these rhythms brings an interesting
point to light. Although all the velocities were fine for our original
pattern, they needed to be changed slightly to make the rhythms work
with different voicings. In example three the ride bell notes all had to
have their velocity increased by +30. This was because the offbeat bell
pattern became more a part of the overall rhythmic structure and without
it cutting through enough, the rhythm appeared to have gaps in it.
With example four the opposite had to be done for the
offbeat snare ghosts because the snare was dominating the rhythm and
obscuring the groove. All these off beat snares were reduced by –10,
leaving the main back beats on the snare at their uncompromising volume.
The remaining hi hats however had to be raised by a staggering +70 to
make the rhythm sound well balanced. The important thing in these
velocity alterations is that each transposed group had all its notes
altered by an identical amount. This helped to keep the natural shape of
the velocity levels as in our original.
IN THE
GROOVE PART 3
We'll continue from where we left oft last lime by
looking at different voicings for rhythms, and the 'drummer’s logic'
behind them. Here is the last example from the last article.
The event list readout is significantly different from
last month because I've played it in afresh, paying special attention to
keeping the snare ghosts as subtle as possible. This rhythm would
normally be played with the right hand crossing over the top of the
left, playing the hi hats and snare backbeats, whilst the left plays the
quieter snare ghosts. This positioning makes it easy for the right to
move around the kit playing different sound sources. This right hand
wandering technique is very common for drummers and makes some seemingly
complex patterns quite easy to play. For the moment I am deliberately
using simple patters with aim of getting the concept across. At eh end
of the day you will be much better off with the concept than a disk load
of grooves.
Here is example one including an indication of the
sticking used. As with all the examples in this article the tempo is
120. (Click the remaining images to enlarge).

Below left is the list of events from example one. Notice
how quiet the snare ghosts are. One might think that it would be
pointless to have notes with velocities as quiet as these but, if they
had not been played as part of the rhythm it simply would not sound the
same. It all contributes to the feel and groove of the rhythm.
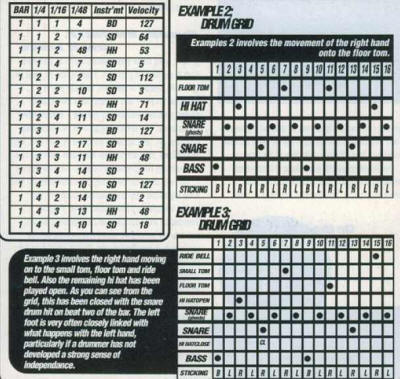
Example 3 involves the right hand moving on to the small
tom, floor tom and ride bell. Also the remaining hi hat has been played
open. As you can see from the grid, this has been closed with the snare
drum hit on the beat two of the bar. The left foot is very often closely
linked with what happens with the left hand, particularly if a drummer
has not developed a strong sense of independence.
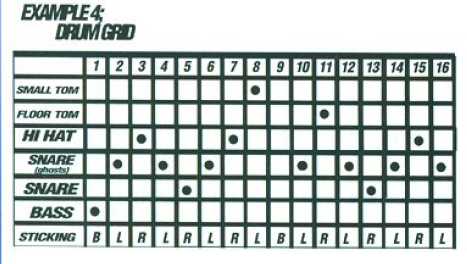
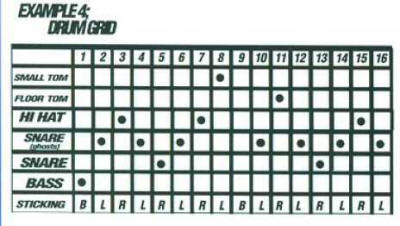
Working from the bottom up, the next step might be to
start moving the left hand around the kit. The easiest way for a drummer
to do this would be to move up to the small tom. Example four
incorporates this technique. Notice how with all these rhythms the
sticking is unchanged. This demonstrates the many possible ways a simple
idea can be used. Of course, a drummer might not keep a rhythm as pure
as this, but all his deviations from the model would be with regard to
technical considerations such as these. The only thing I've had to
change to make this rhythm groove is the omission of the bass drum on
beat three of the bar. Try putting it in yourself and see how it pulls
the rhythm back and make it less exciting.
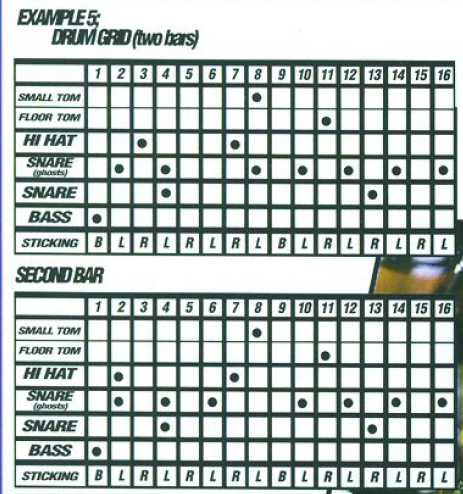
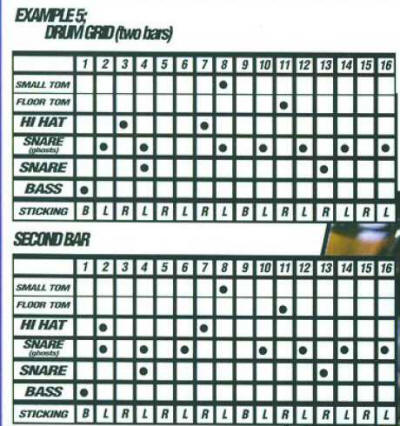
Example five is another simple manipulation of our
rhythm. This time I've made the phrase two bars long and removed the
first bass drum in the second bar. This is where the significance of the
ghost notes really stand out. Listen to how the rhythm falls away and
swells back in where the bars join. It is easy to fall into a trap of
adding things to improve the patterns as is evident from this rhythm, it
is often taking something away that is best. In this instance it
transpires that there is no bass drum in the second bar of the groove.
One thing some of you might have noticed about all the
rhythms this month is that they are all linear; that is, they are made
up of a string of single note, one after another. (Excluding the hi hat
closing in example three) This is a very common way for drummers to
compose rhythms nowadays. It adds a whole new dimension and serves as a
very adequate alternative to putting together independence-based rhythms
involving simultaneous sounds. It also helps create a lot of space and
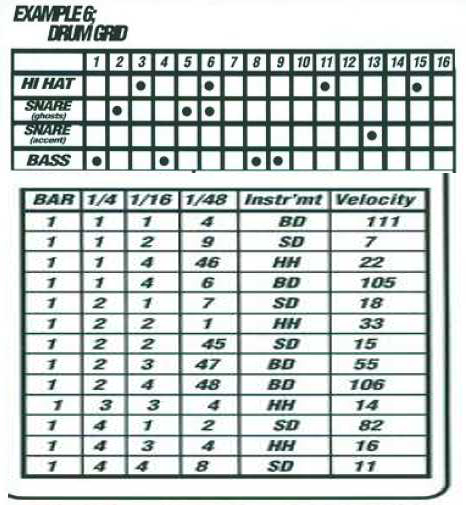
clarity in a rhythmic structure. Example six is a typical example of
modern linear drum pattern. Here is the drum grid and event list for
this rhythm. It's interesting to see how full the rhythms sound bearing
in mind how few notes there are being used. Obviously, at different
tempos this would change considerably.

When the patterns begin to get more intricate and subtle,
so too will the velocity read out from the event list. This is clearly
evident from this example.
The first noticeable difference from our previous rhythms
is the velocities of the snare back beat and the bass drum notes. The
loudest bass comes in at 111 on the first beat of the bar whilst the
main snare accent on beat tour is a mere 82. This is because this rhythm
is back beat - orientated. The snare back beat for this particular
instance cuts through because of the subtlety of the ghost notes and
other parts of the rhythm.
Also of note is the velocities of the two bass drum notes
are played. The first is almost halt the velocity of the second, This
contributes strongly to the effectiveness of that little double push on
the bass drum. Try bringing up the velocity of the first to match that
of the second and see how it makes it feel less natural.
The shape at the rhythms timing is also worth mentioning.
Look at how it starts late, becomes slightly early by the two pushed
bass drums in the middle of the bar and gets gradually late again
towards the end, jumping in very small steps of timing as it does so.
The maximum it is ever out by is nine ticks and the biggest single leap
in time is five ticks. (One 16th note consisting of 48 ticks)
IN THE
GROOVE PART 4
So far we've been looking at some philosophies behind
drum patterns as played in real time and by a real drummer. This month
we're going to look at some basics of percussion technique and see how
percussion fabrics might be constructed.
We've all got sounds such as Conga Mute, Conga Slap and
Conga Open Tone on our sound modules – but how can we construct
natural-sounding rhythms using these sounds? Furthermore, how can we
combine other sounds such a Bongos and Claves to make authentic-sounding
rhythms? To begin answering these questions, we need to begin looking at
some of the basic techniques on the instruments. We're going to start
with Congas, and we'll use a set of two to begin with, to keep things
simple (in Cuba, Congas come in sets of anything between two and eight
drums).
As with the Drum Kit, the melodies of the rhythms are
constructed from main rhythmic lines – such as between the bass and
snare of Drum Kit – and supportive lines, such as played on the Hi Hat
or Ride on the kit. For the Congas, it's the slaps and open tones which
provide the main rhythmic fabric and the muted tones which stay in the
background. The basic building block of most Conga patterns is called
the ‘Tumbao' and is played on the low Conga (Tumbao actually means
‘repeating pattern'). It is on top of this that the high Conga would
play its patterns and both drums would make up the rhythmic melody. Here
are three different examples for both patterns. Notice how the patterns
lock in together and form what sounds like one drum pattern.
This really is the philosophy behind many Conga patterns
which in their cultural idiom would be played by different players. I'm
not a purist and am not trying to push any tradition only the concepts
behind that tradition. The concept here is to get a simple pattern on
the bass Conga and then come up with a pattern on the high Conga which
has open tones and slaps falling between the open tones of the low
Conga. Using this approach any patterns could be effectively used just
so long as they lock in well together. Here are our three interlocking
patterns. (Ex 1/2/3)
One thing to note about the high Conga patterns is the
absence of the muted tones in the rhythms. Normally when these patterns
are played between two drums, both of them would be filling in all the
unstressed parts of the beat with muted tones. Articulating this effect
on a general MIDI patch is more difficult unless you have a module which
lets you de-tune the individual drum notes to avoid the flanging effect
of having identical notes repeating at the same time. The only
successful way I found to do this was to de-tune one of the drums muted
tones.
I've avoided the problem in these examples by avoiding
the use of the muted tones in the high Conga part. Now let's look at
some of the velocities. Prominently low are the muted tones, leaving
space for the open tones and slaps to sing through. The mutes are very
understated indeed. It's quite clear to see that the slaps and open
tones on both drums are doing exactly what the bass and snare were doing
in our previous articles.
So far so good, but to begin building up the percussion
into a fuller fabric, there are three basic sounds one could add. Those
are metal, wood and shakers. These are what I think of a glue which bond
together in rhythm and syncopate it. The basic wood pattern would
generally be played on two wooden sticks called Claves. Here is the
basic pattern in three different forms.
The first is called the 3:2 Clave because there are three
beats in the first bar, and two in the second (these patterns are twice
the length of our previous Conga patterns)

The second is called 2:3 Clave because, er...!!!!

The third is a clave pattern with more of a flowing and
Brazilian flavour

For the metal pattern we might choose a Cowbell (or
something like Agogo Bells if we wanted a more Brazilian sound)
Like the Clave pattern the Cowbell pattern, has a 2:3 or
3:2 feel to it. This is not because it has three beats in the first bar
and two in the second, but because it locks in with the clave pattern
and because the main stresses of both patterns fall in the same place.
Therefore, if the 2:3 Clave is changed to the 3:2 Clave, then the
Cowbell pattern will also have to be changed. Here are both version of
the Cowbell pattern.
Finally come the Shakers, in this instance, the Marracas.
These bond the whole thing together by playing a steady eighth note
pattern.

We get the our full fabric by combining one from each of
the sections, ie one Conga pair, one Clave, one Cowbell and the Shakers.
This gives us quite a full-on traditional flavour, but if you use this
basic concept build a percussion fabric then you could create something
sounding anything but traditional.
IN THE
GROOVE
PART 5
The first things a drummer learns, besides how to play
the first basic beats are the rudiments. On the surface of things, these
can appear rather dry, boring, tedious, academic and destined to get you
more than half-way up the road towards the anorak shop. However, when
you delve a little deeper, then you can actually find a very usefully
tool in creating rhythmic fabrics.
For example let's take a very simple rudiment - the
paradiddle. This is quite simply no more than a sticking pattern
involving single and double strokes. The basis on the pattern is this.
The first way this might begin to be employed on the drum
kit is by placing each hand on a different sound source. To begin with
we'll play the rudiment with the right hand on the hi-hat and the left
hand on the snare. We will play this as sixteenth note rhythm. Then grid
for our rhythm will look like this.
As a step-written rhythm, this sounds pretty stiff and
uninteresting so let's get our MIDI drummer out of the box and see what
he comes up with. Here is the readout of the event list.
The first thing that is noticeable is that all the notes
falling on the beat are stressed, giving us our back beat emphasis. All
the other notes are played subtly and sit behind these strong points of
the rhythm and give it quite a flowing feel. Notice that the main
accents are falling on the second and fourth beats of the bar and the
snare velocities 109 and 128. Secondary accents are falling on the beats
one and three on the hi-hat (velocities 66 and 93). Most of the other
velocities are in the twenties apart from two hi-hats which rise a
little higher.
This velocity shape gives a seemingly boring linear
pattern some form, and makes it a much more interesting rhythm. The
timing of the pattern is also of interest. If you study the event list
closely, you can see that most of the strokes are falling late by
between five and twelve ticks. This adds a lot to the relaxed feel of
the rhythm. Remember in some of the previous articles the individual
strokes were often anticipated creating a rhythm which drove ahead much
more.
On inconsistency in timing within the rhythm is the
hi-hat which falls before the snare back beat on the fourth beat of the
bar this on hi-hat actually comes slightly early. It's thee odd little
inconsistencies which add to the natural fell of a real drummer
drumming. Logically speaking, one might never consider throwing in an
obvious inconsistency such as this into a programmed drum track, but I
would urge you to reconsider.
Anyway the rhythm actually sounds quite full at this
stage, even though there is nothing being played on the bass drum as
yet. It's a good thing to get a rhythm that works well without any bass
drum roles. This gives you the flexibility to copy this patter
throughout a whole section of a song, and then work on the bass drum
separately. This could have a number of advantages. For example you
might want the rhythm to flow smoothly yet also want to follow a very
off beat and varied bass line tightly. Simply copy the bass line to
another track, put it on the right MIDI channel for your bass drum sound
and bingo.
You might then go through the bass drum part and erase
some of the less important notes to allow the bass part some space. You
could also delay a few select bass drum notes to make it sound a little
more natural. Right then, lets loook at a few timing templates for the
bass drum so we can add these to our rhythm.
The next possible manipulation of the drummer’s rudiment
would be beat displacement. This simply means taking any pattern and
starting it one, two or however many beats later or earlier than the
correct placement.
For our rudiment in question, these next three examples
show how it would turn out with different placements. All these
examples can be mixed with the bass drum templates above.
The basic theory behind these rhythms is to come up with
a top line and then tailor the bass pattern to fit whatever piece of
music you might be writing. One style of drumming this immediately
brings to mind is the folk drumming of India. Whether it's played on a
pair of drums such as the Tabla or double-ended drums such as the Dholak
or the Dhol, the basic ideas behind the grooves are very similar.
A lot of Indian drumming entails drums which have the
treble sounds on the one end of the drum and bass sounds on the other.
It's very common to get continuous repetitive patters on the treble end,
whilst the bass end plays a more spacious and syncopated part (excluding
the wild rhythmic flurries very common in all Indian music)
To finish this article, I’m going to put a few patterns
of this style under the microscope, using help of our trusty MIDI
drummer. What we have are thee version of the 4/4 folk rhythm from North
India called Kherba. If you do not have access to any Tabla sounds in
your sound source then try a high bongo as the Hi Tabla sound, and a
deep floor tom or a subtle bass drum as the bass tabla sound.
The sounds I've used are the high pitched 'NA' sound
which is played on the rim of the small Tabla drum, the slightly lower
pitched TIN sound, which is played just inside the rim of the small
drum, and the low bass sound called. 'GE' (for those of you that might
not know, all the sounds on the tabla are represented by a phonetic
utterance. All the patterns that can be learnt on the Tabla can also be
recited in words).
I've reinforced the 'GE' sound in these examples with the
Udu pot open sound. This is not included in the grid or the event list
below. Just think of it as a sound employed to reinforce the bass drum.
The actual structure of these rhythms is very simple.
What makes them work in this context is the stressed and unstressed
beats. Take a look at the even lst for example five. We can immediately
see how the high pitched 'NA' sound is cutting through with it's
velocities. In many ways, it performs the roll of the drum kit in drum
kit rhythms. It is the sound most recognizable from the Tabla
repertoire.
IN THE
GROOVE PART 6
This sixth and last part of the ‘In the groove' series
deals with an area I've had quite a few enquiries about recently –
namely drum fills in the context of programmed grooves. Drum fills are
something you don't hear all that much about, and seem to be rather a
mystery to many non-drummers. To be honest, they are also frequently a
mystery to drummers, who think of this area of their art as an
opportunity for self-indulgence, rather than as a musical contribution
to lift a piece of music and help build bridges between sections.
Whatever way you look at it, drum fills are a totally
necessary adjunct to any drum pattern with the least aspiration of
sounding natural. One way to describe them is as rhythmic cadences which
pre-empt a change in musical passages. Drum fills are effective when
they maintain the feel and flow of the music without detracting from the
point at hand. If it stands out like a sore thumb by speeding up or
slowing down or because the drummer is being heavy-handed and unsubtle,
then it's not the drum fill for the moment.
So how do we go about programming effective – and musical
– fills?
There are a few basic principles behind the sort of fill
a real drummer might play. Although it may appear rather obvious, a
drummer has two arms and two legs and therefore can't continue playing
the rhythm while executing the fill. This is what makes programming
fills difficult – to keep the feel of the rhythm while the groove isn't
happening is a challenge indeed.
Next come tonal considerations. If the body of your
rhythm is tom tom based and you want a fill to stand out in contrast,
then it might work to employ the snare, or some accents and pushes on
cymbals and open hi hats. Similarly, if the groove has been more hi
hat/snare/bass drum rooted, and then an adventure around the toms might
be the thing to do.
Rhythmically, it might be wise to use the general
contours of your main rhythm as a template for the fill. Alternatively,
you could transpose elements of the rhythm onto other drum sounds. Go
into the list edit, tinker with a few velocities and bingo.
Anyway, I'm going to cover six fills and explain some of
the concepts involved. Each fill is one bar long and is preceded by one
bar's groove. Most of the six fills are linear-based, in as much as they
are constructed from single sounds (a linear drum pattern is a pattern
that does not use two different sounds at one time).
!
The building block of the first fill is contained in the
first four semiquavers. This 'drum lick' is very common amongst drummers
and can be heard on a lot of recordings in many different musical
idioms.
The basis of the pattern is four notes long, starting on
the high-pitched snare and going on to the small tom, floor tom, and
then the bass drum. Each note could be conceived of as slightly lower in
tone than the last, adding tonal shape to the concept (of course, you
could always do the opposite, starting on the lowest tone).
The other relevant factor for this is the sticking that
would be used by a drummer to articulate it on the drum kit. For a
right-handed player this would be played in this order:
Right-Left-Right-Bass. This is what leads on to the rest of the fill.
The sticking remains the same but is played on different drums. There
are also two double beats on the bass drum after the second and third
repeats of this pattern.
The second fill is a common drum fill found on a lot of
pop records. It is based on the common or garden ‘single stroke roll'
with the leading hand venturing onto the toms.
There is a lot of space in this fill, and it is very
important not to cram every available space with a drum beat. It might
be the only drum fill in an entire song, but that is no reason to
overcrowd it. It might seem perfectly logical that continually adding
things will necessarily make a composition fuller, but it is more often
the case that subtracting something adds more to the end result.
Notice in particular the subtle ghost notes in this fill.
It is the subtlety of these notes as they lead up to the accented parts
of the groove that really make this one work for me.
The third and fourth fills are also based on this single
stroke (R-L-R-L) pattern but involve the movement of both hands around
the toms. Try going into the list edit or the score edit and transposing
the various elements onto different drums, and see what you come up
with.
Example five involves a three-beat pattern which is
played around the toms, descending from high to low and ending on the
snare with a ‘flam' (an accent which is preceded fractionally by a quiet
note – these are very effective in fills and can be used on toms or any
sound source you could choose to think of).
This fill is brought to its conclusion with a meaty crash
on a Chinese cymbal. These cymbals can also be very effective when
they're used as reinforcements to snare drum accents.
Notice how all these fills include the first beat of the
following bar. In each instance, these are falling early, just before
the end of the fill-in bar. This is because the fills are slightly ahead
of the beat and are pushing the tune – if there were one – into the next
section (for a detailed explanation of timings in the event list, you
ought to look at the previous five articles in this series). This means
that when you write the rhythm that follows on from the fill, you will
have to omit the first bass drum and hi hat in the first bar of the
pattern to avoid the flanging effect of having two bass drums sounding
at once.
You might also need to tinker a little in the event list
to make a neat join. I always prefer to omit the first bass drum of the
rhythm rather than the last bass drum of the fill, because it seems to
keep the integrity and feel of the fill intact.
The sixth fill is slightly longer and starts around
halfway through the last bar of time. This brings another important
hypothesis to light: namely ‘kick off notes' – otherwise identifiable as
starting places for your fill.
A fill really does not have to be one bar long. It can
start anywhere in the contours of your rhythm. This fill catches the
listener by surprise because it is slightly off beat and syncopated. The
real starting point for this fill is on the sixth eighth note of the
penultimate bar. A repeating three-beat pattern (Right-Left-Left) is
then explored with the right hand moving around the kit and comes to a
climax with a flurry of accents and ghost notes on the floor tom and
snare. This sort of syncopated effect can easily be obtained by thinking
of an equal bar as comprised of lots of different-length units. For
example, a bar of sixteenths could be divided 5+5+6(=16)
If you have worked on these
examples, please send me the midi files and audio so I can add that for
other users. You will be credited. Also, if this has helped
you get natural sounding grooves then send me the results and I will
post it on this page if it is good.