Getting started with drum
and percussion programming! |
Like it or not, drum and percussion
programming is here to stay so you might as well get acquainted with at
least the basics of what you can achieve with your trusty old
computer. You do not need a massive investment to get started,
just a computer with a good sound card, a good amount of
RAM and
storage capacity, a MIDI keyboard and/or a
MIDI drum pad. The first question is
MAC or PC?
Anyone who uses a MAC swears by it, as does the PC user. A
high
spec PC is better than an old spec MAC but, a top line
MAC is
unbeatable, although four times the price. I actually use a
PC and
have had great results from it. The thing that really swings it
for MAC though is that they now own and develop Emagic's
LOGIC software
which is sadly not being updated for the PC. Luckily for me, I am
satisfied with my Logic Platinum 5.5. More about the programmes
later but let me just say, this page is about what I use and program
with. It is not a computer trouble shooting page and is intended
to give you a quick reference guide of what you might need to get
started programming.
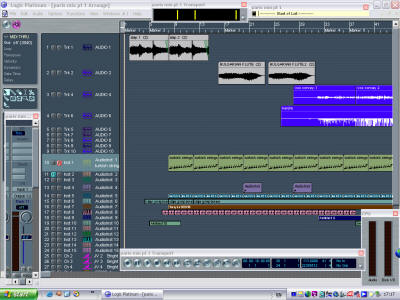
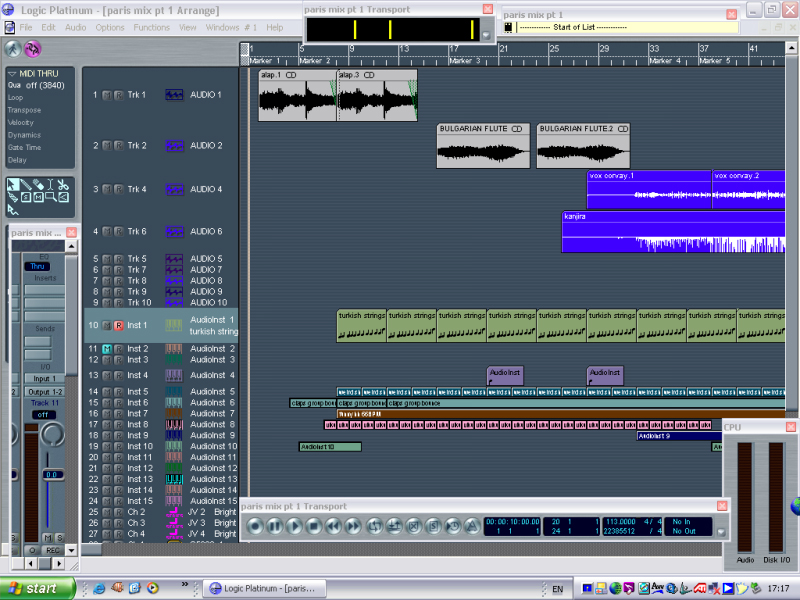
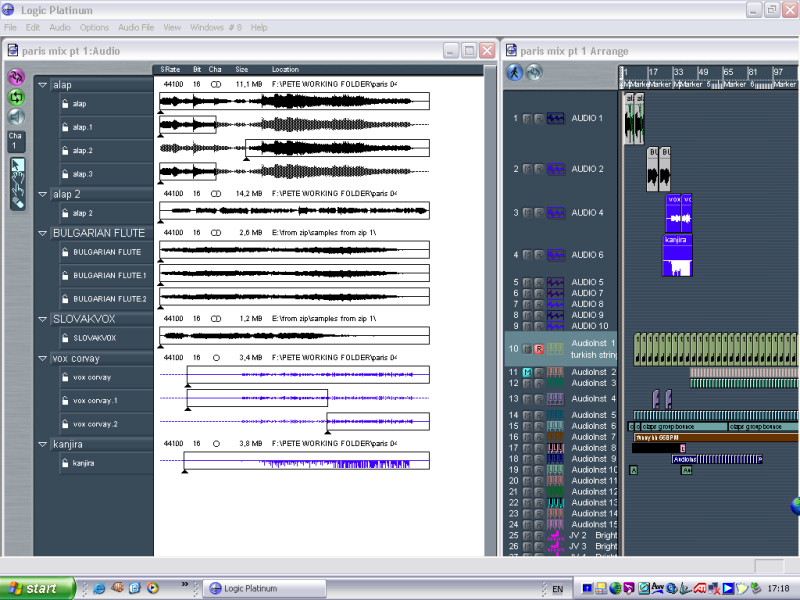
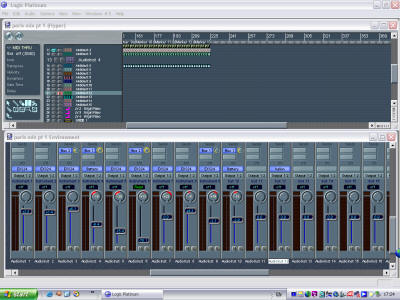
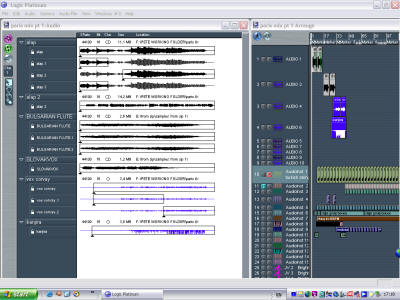
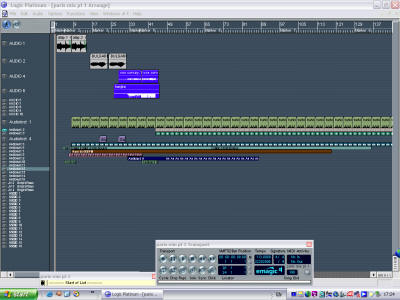
Logic Platinum 5.5 main arrange page

There are a number of very good
programmes available to record audio and programme in MIDI data. I
prefer to use LOGIC Platinum, version 5.5, the final version available
for PC since Apple
took over Logic. Within logic you get a number
of standard 'Plug ins' (Small programmes that run inside
Logic,
Synthesisers, drum machines, samplers etc). For the percussion and
drum programmer, the most important of these is the
EXS24 which is an
internal sampler. More in detail about this and other plug ins
later but suffice to say, a lot of top programmers use only logic and
the EXS24 to do their drum programming. I actually prefer to use
some additional 'non-Logic' plug in samplers and external audio editors
such as Sonic Foundry's Sound Forge and the
Stienberg sampler called
Halion.
Let's start with the
central program for
the whole process, Logic. You can get different versions of Logic
which have less features than Platinum and all of them are pretty
decent. Make sure your bundle includes the EXS24 sampler. The
great thing about Logic is the screen sets which you can set up
yourself. You switch between the screen sets by associating them with
the numbers at the top of the qwerty keyboard. More about this later.
First, above is how my main arrange page is set up. (You set the
program up to suit yourself and save it as an auto load song. Make sure
your auto load song is protected by making it a 'read only' file.
This you do by right clicking the icon of the closed song, selecting
properties and choosing 'read only'. I tend to save my auto load
song on the desktop as well as in the logic folder and boot that up each
time instead of booting from the launch program icon. This way you
are double protected from overwriting your auto load song.
I name it 'autoload' + the date)
I have had the whole program
set up in a way which really suits the way I work. Some of these
things may not work for you but they are a good starting point. At
the top of the track list are the audio tracks, below that are the
internal audio instrument tracks and below that are the
external synth/sound
module tracks. For the purpose of this programming article we are
only really concerned with the Audio and Audio instrument tracks.
The audio instrument tracks are where we find our plug ins, such as the
EXS24 sampler etc. We will come to that in a moment but first I
want to talk through the other components of the page I have
constructed. To the far left is the individual fader and control
for each track. As you highlight a track in the list, the relevant fader
appears on the left, making it very easy to adjust without switching to
a different window. In the bottom right hand corner is the
CPU monitor and Audio in/out meter. When the system is glitching it is
easy to check if the CPU is overloading. The long bar in the top right
corner is the event list for whatever part is selected in the arrange
window. This is a really easy way to move parts very small amounts
other than dragging and dropping. To
the left of this is the song position counter. It reads where the
song play line is at and is also a cool way to whiz round the song
quickly, just click, hold
and move the numbers up or down. This is how I like my main screen
to appear and have it as #1 on the qwerty key pad numbers. It is
also important to lock the screen set, so when you enlarge and
re-configure the screen, you know that simply tapping '1' will take you
back to your starting layout. Once you have set up all your screen
sets, you really want to keep them protected.
The next important thing is
what tools you assign to the mouse clicks. I have pointer on the
left and magnifying glass on the right. This makes it really easy
to go through different levels of enlargement when editing, bearing in
mind that clicking the magnifying tool anywhere on the background takes
you back through the previous recent levels of magnification. A truly
great function.
Theoretically, you could do
most of your work from this window, recording your audio and assigning
plug-ins to audio instruments.
I use three main plug in samplers within Logic,
EXS24, Stienberg's
Halion and Native Instruments
Battery sampler. (Used extensively by Linkin Park I believe). They all have different benefits or annoyances
but, as a package the three of them are a great team. Let's start
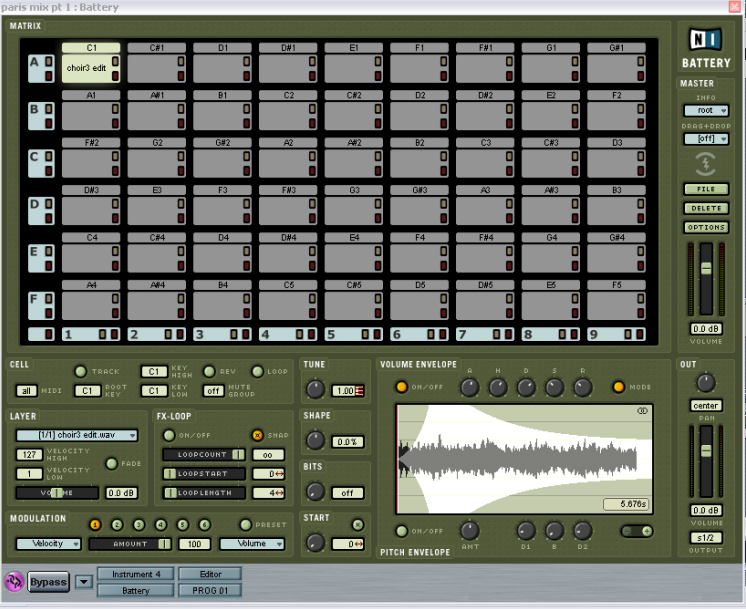
with Battery, probably the most intuitive and 'drum machine' like of
them all. The GREAT thing about this sampler is that the whole shabang is on one page. Here is the view of the
Battery layout.
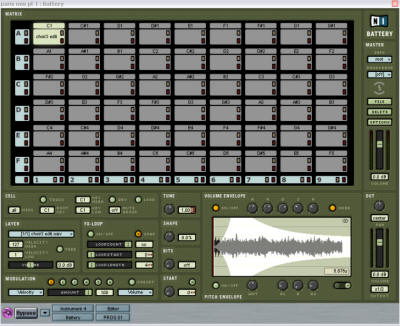
Battery main page
This is a truly convenient
piece of kit. Each cell of the grid like structure is a
sample, with
each cell having the possibility of having a number of different layers
for dynamic triggering. I personally feel this dynamic trigger level
editing is easier in the halion sampler. That aside, the ease of
function by having everything visible is amazing. Look at the
screen, you have volume, pan, the wave form, pitch, bit rate, literally
everything in view. Underneath each cell you then have information
displayed, so, if you select 'pan' on the right, the pan settings for
all the cells are displayed under the cells, select 'midi note' on the
right, the midi note settings for all the cells are displayed
underneath. It is really easy for quick reference, instant tuning
and a whole load of other things. Just load in your
samples into the cells or choose from and number of battery kits
either available with the program or separately. It is quick to set up
mute groups etc as well, necessary for kits with open and closed hi
hats. It is also great for instant tuning of vocal and and other
samples you might want to use. I sometimes find it easier to put a
whole long audio sample into battery and tune it that way rather than
using the audio editing facilities in Logic which are permanent to the
file. This leaves the original file untouched. You can also
get into the habit of saving all your kits and build up
your own
library. However.....get a firewire drive and back
everything up!!!
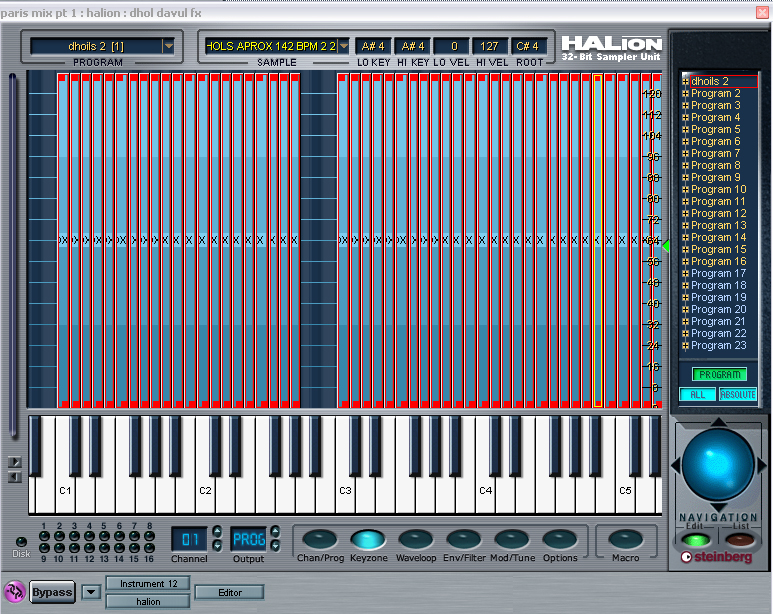
Halion is the next topic.
Another great machine but, the least used of all three by me to be honest.
Here it is.

Halion main page
I don't need reminding that
this does not look at all intuitive! What this is really good for
is quickly arranging different dynamic levels for multi layered notes.
Each one of the tall thin pillars above is a note. The bottom of
the pillar represents zero velocity and the top
127. You just grab the
top corner of one of the pillars and shrink it down so it is shorter and
it will not sound over a particular velocity. Then drag
another note above it and that will sound where the other one stops.
You can do cross fades as well by overlapping them, or if you drag them
so they are wider then they sound over the number of notes represented
by the keyboard at the bottom of the screen, obviously being de-tuned or
tuned up over the notes it covers. (In the same way any sample would on
if spread across different notes on the keyboard.)
Halion also has a number of
pages for various sampler functions. Quite some distance more
complicated than Battery though.
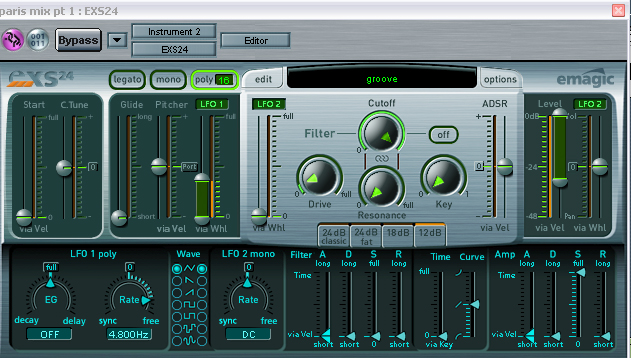
Finally for the samplers,
the EXS24 emagic sampler. Here is what it looks like.
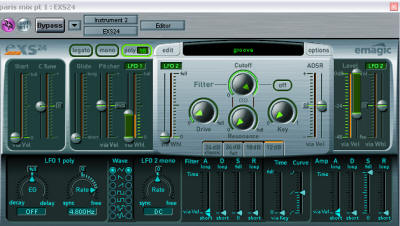
EXS24 main page
This looks even less
intuitive, in fact, it is bordering on oblique. This does however
have one really instant feature which is very easy to use. With
the EXS24 it is very easy to build instruments from REX (Recycle) files
and import them into arrangements very quickly. Before we move on
to that, lets take a quick look at ReCycle and REX files. Years
ago, with the first onslaught of the sampling age, enthusiastic sample
heads would sit all day cutting drum parts up into the individual
segments and spread them out across the MIDI
keyboard, a slice per note
of the keyboard. Then they would construct their own grooves using these
slices. It is the roots of hip hop and most electronic based
percussion we hear today. Thankfully, this has all become a lot easier,
if not staggeringly simple and quick. It has a lot to do
with the rising level of unemployment amongst drummers! Anyway,
say you have an audio file of a groove. It can be anything,
drum
kit, bongos, tabla whatever. Load it into
ReCycle and top ant tail
it by setting the left and right locators and selecting process, then
crop loop. Make sure you have a perfect loop.
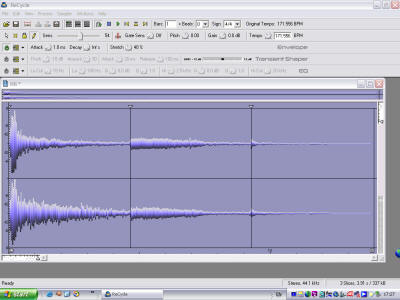
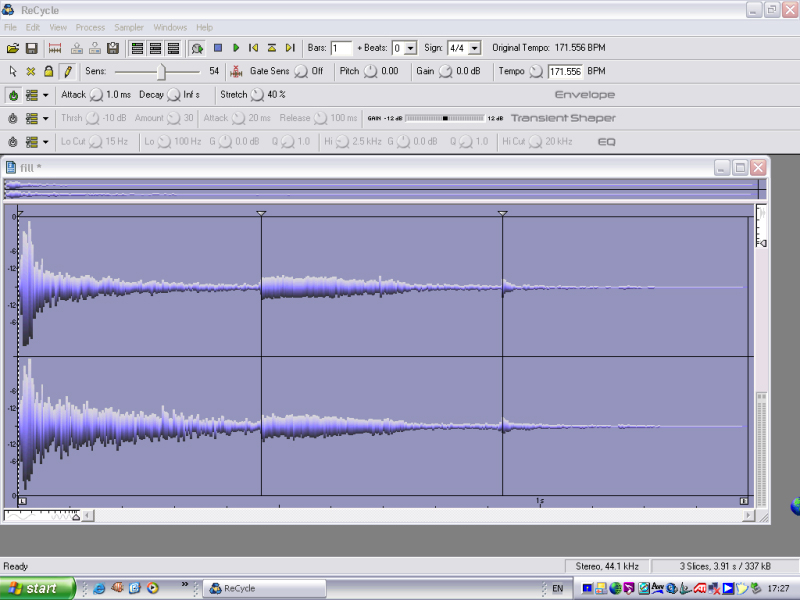
ReCycle main page
We can now move on to slicing up our
loop.
With files that have very clearly defined attacks, like
staccato drums
this is much easier than with a shaker part where the peaks merge into
each other. Lets look at the process in steps.
After you have made your loop perfect
you need to go through the following steps;
1, 2 & 3; Set the time signature and number
of bars beats. You only need to add the number of
beats if you
have an odd length bar. 11/4 for example would be two bars of 4/4 plus
three beats. Don't ask me why they do not have a more
comprehensive time signature selection from the drop down menu.
MADDENING!
4; Clicking this button calculates the
tempo of your loop, bearing in mind all the factors you have input.
5; Slide the sensitivity slider and you
will see all the slices appear within the loop. Set this level too high
and you will have a ridiculous number of cuts. Too low and there will be
too few. You can see in the main ReCycle screen above that there are
three slices. Obviously, if it were an eighth note hi hat pattern
over one bar, you would have eight slices. You may need to go through
each slice manually after trying the sensitivity slider to double check that all the slices are neat.
You flick through them with the yellow buttons next to the
Bar counter
(3). You can then manually move the dividers for each slice
to fine tune the edit.
6; You can optionally add these three
channels of EFX or mess with the individual slices, reverse them, change
their level etc. All you need to do then is save your file and
import it into the EXS24 from within Logic. (Save the tempo in the name of
the file as well).
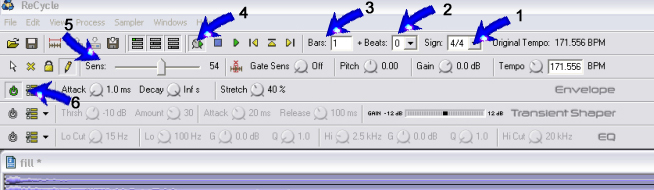
ReCycle editing controls
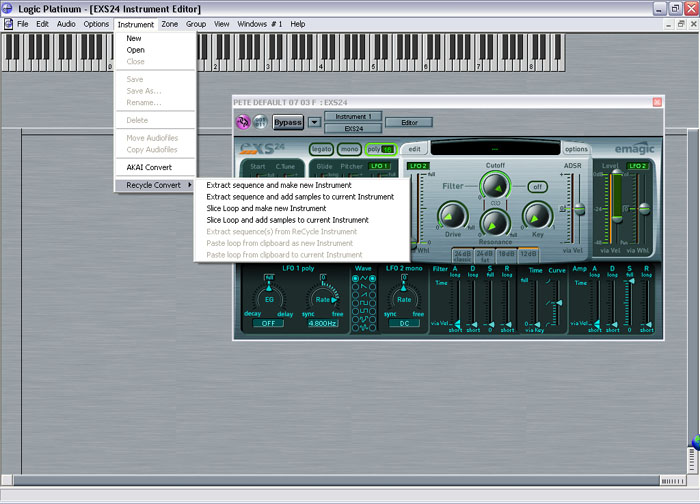
First we have to open up the EXS24
in Logic.
We do this from the channel mixer in the environment. As mentioned
earlier, I have this open always in the bottom left hand corner of the
screen. (Get a techie friend to help you set this up. I did!!)
Here we can see the third arrow down is where we pull up our audio
instruments. All the boxes will be greyed out to begin with but,
left click and a menu appears, select Logic instruments, Stereo then
EXS24. (Make sure you have highlighted the track you want to
select this for in the arrange window)
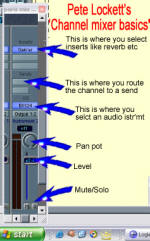
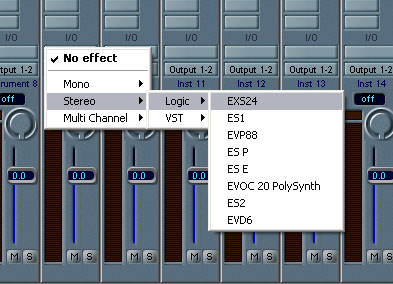
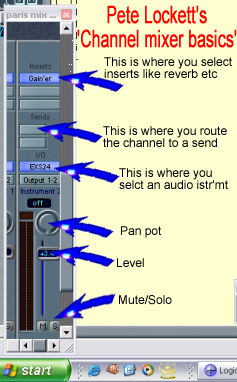
Mixer
Pull down menus for selecting EXS24
Then the main EXS24
window will appear.
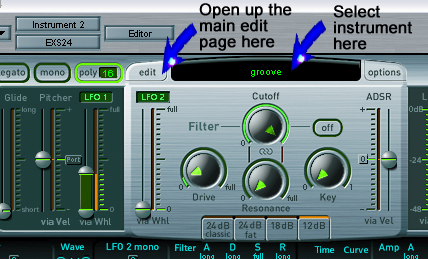
Click 'edit' and then this second EXS24 edit window will appear. The main EXS24 edit
page. Then select 'instrument' and then 'ReCycle convert'
and then 'extract sequence and make new instrument'.
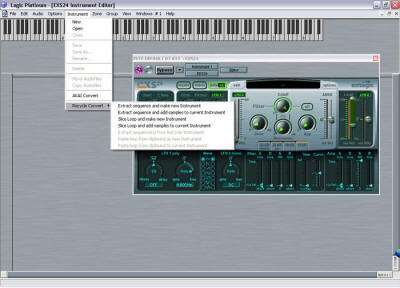
Pull down menus for importing ReCycle/REX
files into EXS24
You then need to select your instrument in
the rectangular window below. When you make an instrument as we
just have, it is automatically saved in the Sampler instruments
folder
in the program files, emagic, Logic folder on your 'C' drive. You
can then put these instruments in their own folders in categories so you
don't get a never ending pull down menu from the face of the
EXS24.
Select edit button and instrument select
panel in EXS24
When you close EXS24
and go back to you
arrange window you
will see that a midi file of the
rex file has been imported at the point
where the song position bar was. Play it and you will see that the
rex file will play and loop perfectly at whatever tempo the track is at.
A couple of points here. If you slow the tempo too much from the
original REX file tempo, you will get undesirable gaps because the individual
samples will not be able to fill up the space. Playing them at a faster
tempo usually presents no problem though. This is why it is
important to put the tempo in the file name when you first make the
ReCycle file, so you can easily reference it.
You can also
open up an old instrument from the pull down list. To retrieve the
midi sequence for this, select 'options' next to the instrument select
panel and choose 'extract sequence from recycle instrument'.
Then when you close EXS24 and go back to you
arrange window you
will see that a midi file of the
rex file has been imported at the point
where the song position bar was. Besides
having the sequence facility, if you tap the individual notes of the
midi keyboard you will find that all the single slices of the loop are
spread across the keyboard. Great for making your own loops.
Altogether a very quick and painless process. Another thing you
can do with a drum groove sequence is to go into the event list, find
all the bass drum notes and convert them to hi hat notes. They you
will have your groove with no bass drum. Then on another channel
open up another EXS24 and pull up the same instrument as the one with
the bass drums removed from the part. Then you can play in you own
bass drum pattern to fit the piece of music you might be working on.
You of course then have the facility to process that bass drum
separately, add more 'boom' or swamp it with
reverb for effect.
You could do the same with the snare or anything.
When you make an instrument from a Re-Cycle
file, EXS24 automatically makes a sampler instrument which it stores in
the Sampler instruments folder in the Logic folder in Program files on
your 'C' drive. It also creates a Re-Cycle audio folder in the
Logic folder in Program files on your 'C' drive. The audio and
Sampler instruments are always in their respective folders. If you
make an EXS24 instrument using WAV or AIF files then they also are
stored in their own folder in the Logic folder in Program files on
your 'C' drive. You can change this to another drive if it gets a
bit full. Logic scans the whole computer for the files when you
select an instrument in EXS24. Sometimes it can be very slow, esp
if you have lots of drives connected. Do not interrupt it because
logic will probably crash. It will either find the files or else
tell you it can't.
If you don't use Logic and can't use the
EXS24 in this
way there are alternatives. The best way to import rex2 files is
to use Stylus RMX. With the use of the sage converter you can
import your prepared rex files into stylus and then drag the midi file
into the arrangement to achieve the same result, whether you are working
in Nuendo, Cubase, Cakewalk, Sonar etc. There is also a stripped
down VST version of the EXS24 for these programs but you do not have the
options available to import rex files, only already created EXS24
instruments. You also cannot create a midi file from the rex file
in this version.
I am going to wind up with a little peep at
some screen sets I prefer to use.
Mastery of these really helps
you to work fast and get around the program easily. This first
screen set has all the audio instrument faders and the audio instrument
parts easily visible in one screen. Great for easily re-naming and
seeing what's going on at a glance. The audio instruments arrange
are zoomed right out for a total overview of the song. This page
would never be used for intricate editing of parts.
Audio instrument mixer and audio instruments
in the arrange window screen set
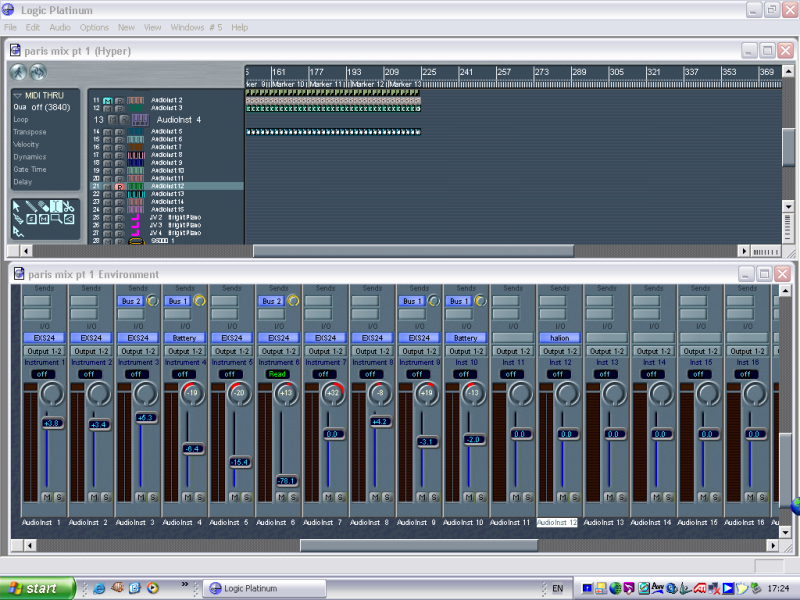
This page is simply the
environment mixer,
mainly for the returns and master faders. The returns are vital to
use if you want to cut down on CPU usage. Say for example you want a
similar reverb on four tracks. If you put that separately on each
track in the arrange window, you will be using four reverbs which will
be sucking efficiency from your system. Put a
reverb on a return,
say return 1. That will then come up on the sends for each track
fader if you route the 'send' to bus 1. A little level meter then
appears and you can select how much reverb, or whatever effect you put
on the relevant return. That way you can use one effect and have
it serving many tracks.
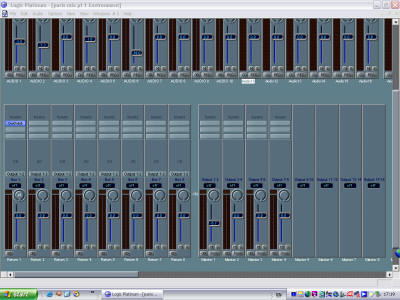
Environment mixer page and route to the
return
If you get into recording audio, merging the
main audio page with the
arrange page as a screen set is great for
dragging and dropping straight into the song.
Audio page/Arrange screen set
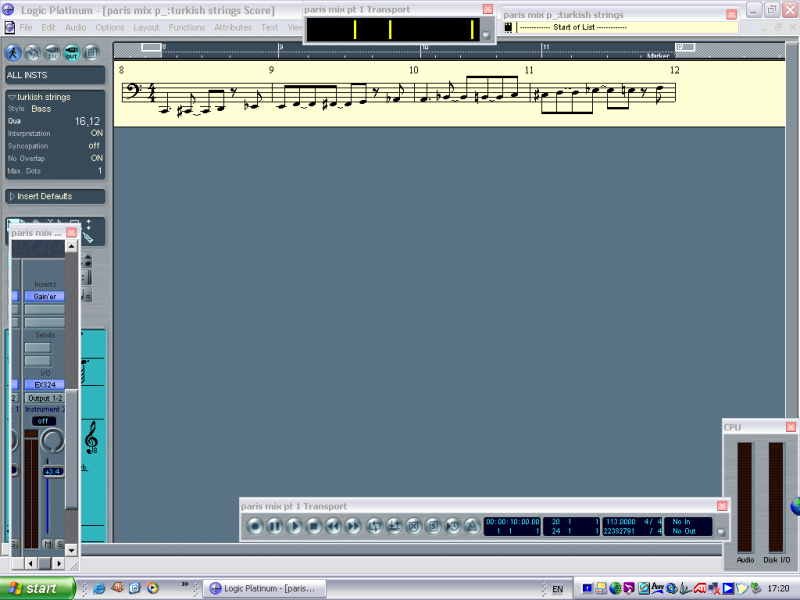
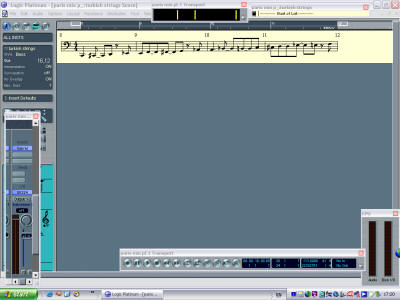
Matrix edit, Event list and score
all on one
page. Fantastic for various editing functions.
Hyper edit/Event list/Score screen set
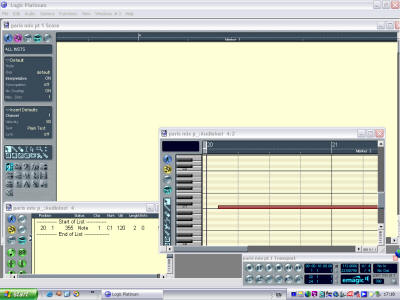
Here is the standard score
window for an
individual part.
Individual part score page
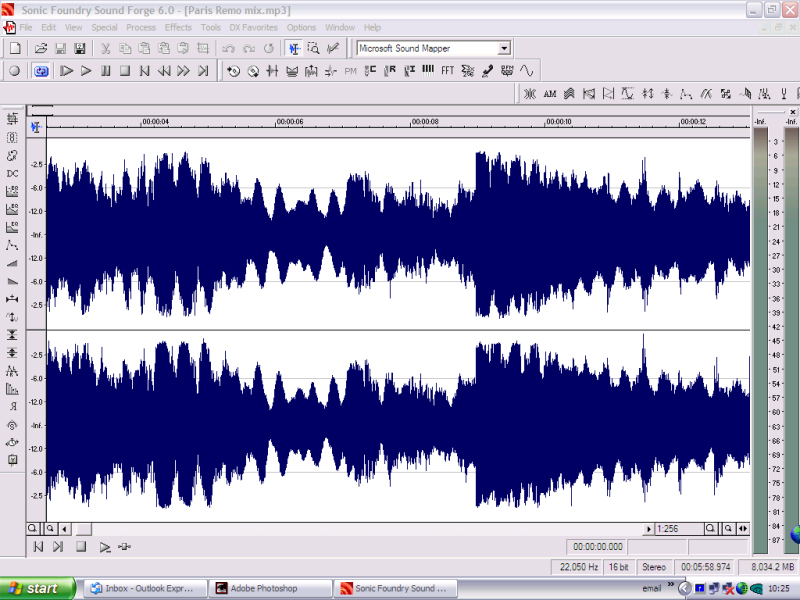
Here we have the audio edit page, accessed
by clicking on an audio file in the arrange window. I prefer to
edit externally on something like Sonic Foundry Sound Forge, esp. with
the power of their Waves plug ins, most notably the
L2 or L3 mastering
software.
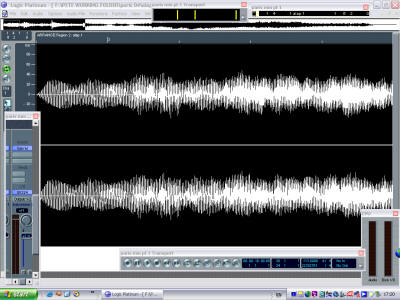
Audio edit page in Logic
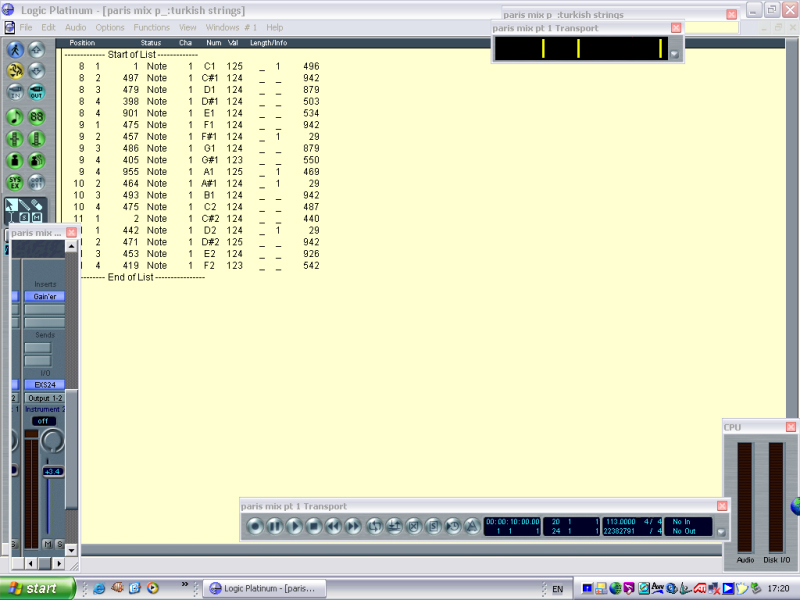
The indispensable event list editor
where
you can really get into minute detail with each midi
event.
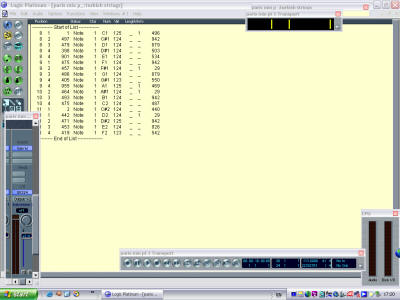
Event list page
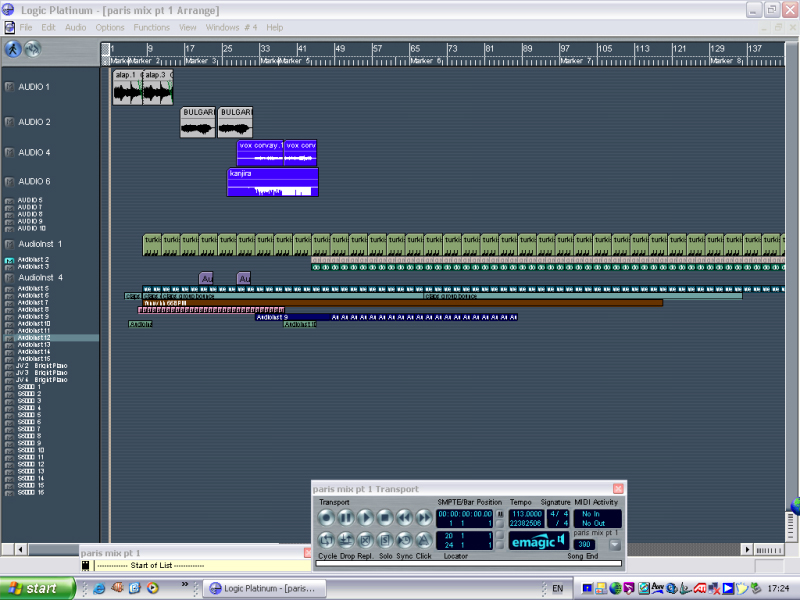
I always have an uncluttered total overview
of the arrangement on one
screen set. Great for whizzing around really
quickly from top to tail. Setting up your markers for the song is
also another very important habit to get used to.
Arrange overview screen set
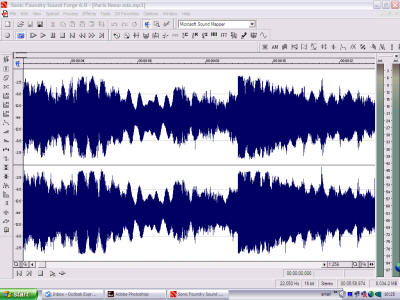
Sound Forge main page
If you are really lazy, you can use plug ins
like Stylus. They have thousands of
tempo marked drum grooves
spread across the keyboard for easy reference. Not my cup of tea
but it does have its uses. It also takes up a lot of disk space,
nine gig of it!
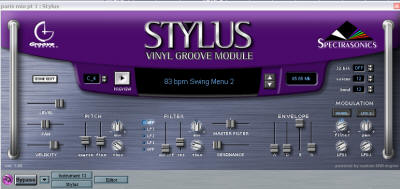
Stylus page
Don't forget, there are a number of ways you
can make your transport bar look. I like this slender option which
does not obscure any of the arrange screen.

One final thought. It is
also really easy to import audio loops and make them the right length.
Say you want to import a four bar loop into a new arrangement and make
that the master tempo. Import the audio file into the arrangement
on bar one. Set the locators to fill four bars, then select
'options' from the top bar, 'tempo' and then 'set tempo using object
length and locators' Then agree to 'global'. Your
arrangement will now be exactly the tempo of the loop. Make a note
of this tempo or lock the tempo. If you accidentally change it
some hours work later, you could have quite a nightmare.
Alternatively you might want to import an audio loop
and make it want to fit four bars without changing the tempo.
Import the loop, then double click it to go into the audio editor.
Open the time and pitch machine and there you will see, amongst other
things, two boxes with a 'before and after' summary of the bar length of
the audio file. Say hypothetically it is three bars and three
beats long and you want it to be four bars. Just change the
'after' box to four bars and
process. Create a back up file so you have a safety net. It
is as easy as that. Obviously, you can't stretch a file that is too
far away from the original tempo because it simply won't work. It
could sound interesting though!
The only other point is to
consider storage and back up. I use two 120 GIG hard drives
internally and have a removable caddy for a third drive. This is
essential for quick and effective back up of your operating system.
I use Norton Ghost and clone my 'C'/'D' drives (120 gig drive 1
partitioned 30 gig for windows and the other 90 gig storage) to an
identically sized drive slotted into the removable caddy. (Then store
this in the cupboard!) All my important sampler instruments and
operating system are on C/D so if it blows up, I just open up the
machine and replace it with the bootable clone which should get no more
than one month out of date. (Don't forget to switch it from Slave to
master mode on the back of the drive) Data from any current
projects will be on E/F drives (120gig drive 2 partitions) or else on
yet another drive in the removable caddy or else on a firewire drive.
There has never been a better reason for kicking yourself than losing
all you data because you did not spend Ł80 on a drive and a removable
caddy!

.jpg)
Special thanks to
Alan Branch who
helped me so much with everything electronic.

|